Arduino Eclipse Plugin V 2.1.0.4 installation
Update: The newest version of the Arduino Eclipse IDE/Plugin is 2.4. The installation instructions and process particularly for the Teensy boards from PJRC.com much simpler.
These installation instructions are written for users that are already familiar with the Arduino IDE. While these are written for Mac users, other than the file locations and slight OS dependent differences in the Eclipse User interface, there is actually very little Mac specific content and these instructions should also work for windows and Linux. If you notice any mistakes or encounter problems, please leave a comment here and I’ll do my best to fix these.
Also these are written particularly for the new version of the Arduino Eclipse Plugin 2.1.0.4, which provides integration of the Teensy processor family, including the new Teensy3, an Arduino compatible board utilizing an ARM Cortex M4 32-bit micro controller.
- Download and install Eclipse IDE for C/C++ Developers (It needs to be he 32bit version of Eclipse Juno. Please do not use Eclipse Kepler!)
- Download and install Arduino 1.5.2 (beta). Do not use 1.5.4 beta. The Arduino team made changes that currently render it incompatible with the Eclipse Arduino Plugin at. Jantje is working on it 😉
I will update the instructions once he’s got it working!- Note: Avoid spaces in the Arduino.app file name. This is a confirmed bug that may be removed in future versions. While compiling code works fine, when uploading it to the Teensy, the teensy loader cannot be found.
- Download the Teensy Extension File.
- Note to Mac users that want to use the Teensy 3 board. The current version of the Teensy Extension file uses Teensyduino 1.15. A number of Mac users have reported problems when repeatedly re-programming/uploading code to the Teensy 3 and the newest version Teensyduino 1.16 attempts to reduce/eliminate these problems and will update the Bootloader on the Teensy 3 with the first upload to do so. If you have not already done so, please install a current Version of the Arduino IDE (0023, 1.0.3, 1.04. or 1.0.5) and then install Teensyduino 1.16. Proceed through the usual steps of compiling and uploading a sketch. This will update the bootloader and will allow you to work with the Teensy Extension file.
- Unzip the file. It contains a folder named “teensy”, which is a compilation of all the Teensyduino 1.15 files needed, e.g. the ARM toolchain and the teensy loader. It also contains all the extra Teensyduino libraries.
- Move the entire “teensy” folder into the “/hardware” folder of the Arduino 1.5.2 IDE. On my mac for example that is in:
“/Applications/Arduino-1.5.2.app/Contents/Resources/Java/hardware” - Start Eclipse. The first time it will ask you to select a workspace. For an Arduino work environment I’d suggest you select the place where you have all your Arduino Projects/Sketches. You can always change to another workspace if you have several of such directories.
- From the Eclipse menu bar Eclipse select “Help” –> “Install new software”.
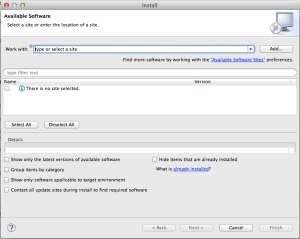
- Make sure to uncheck the five check boxes in the above screen as otherwise you will not see the plugin in the selection window.
- Select “Add” to add the download site for the Arduino Eclipse plugin : http://www.baeyens.it/eclipse/V2

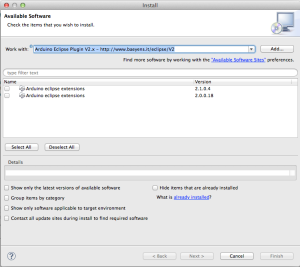
- Eclipse will show which versions are available (Make sure to keep the “Group items by category” unchecked). Select the 2.1.0.4 version and click on “Finish”. You will be asked to restart Eclipse. Accept and follow the rest of the installation steps. The Plugin installs the usual Arduino button icons into the menu bar .
- Now that the plugin is installed, from the Eclipse menu bar select “Eclipse” –> “Preferences”. In the preferences pane select “Arduino” and fill in the appropriate fields for “Arduino IDE path” and “Private library path”. The example below shows where these directories located on my machine. Obviously this may be different on each users machine.

- D.O.N.E. This concludes the installation. And now you can start with your first project using the Arduino Eclipse Plugin


hi, I followed these instructions on OS X with Eclipse Indigo after assuming Juno or later. Ran into problems upgrading the plugin to v2 with org.eclipse.cdt.core.language.settings.providers being incompatible.
v1
Does it have to be Juno and not later?
Many thanks.
Hi Steve,
Eclipse Indigo will not work with the 2.x version of the Arduino Eclipse Plugin. There were a few bugs in Indigo that prevented the plugin from working properly. Indexing, for example seems to work much smoother with Juno.
So, yes, you have to have Juno as that is why Jantje developed the Plugin for. However, I just tried out the newest Eclipse Kepler and arbitrarily choose the 64bit version ( bigger is better, right ? :-). and it took maybe 5 minutes to get it and the plugin installed, provided that my Arduino environment was already set up and working with Eclipse Juno. Compiling the Blink sketch also worked flawlessly. So…for the moment is looks like Kepler may work.
Unless you absolutely have to have Kepler I would suggest to install Juno, until Jantje has give his OK.
At what point in your installation did you get the error message ?
There is one more caveat:
When installing the new version of the plugin, it asks you to provide its workbench location, which in most cases for Arduino users is the location where we have stored our Arduino Sketches and personal libraries.
If you have developed code using a previous 1.x version of the plugin, you’ll have to rebuild your project.
The Eclipse Project Explorer shows you the main project tree amd the root of every project, just like in the Arduino IDE, is a folder with the .cpp and .h files pertaining to that project. As opposed to the Arduino IDE, Eclipse also stores other project data in these folders and generates a few new folders and files of which some are hidden.
To rebuild a project I would rename the original folder ( using the finder, not Eclipse). Then in Eclipse I would create a new project with the exact name of the old project. Eclipse then creates a new Folder with that name and creates a new more or less empty .cpp file and .h file into that folder. These also should have the exact same name as the main .cpp and .h file in the old, renamed project.
Close out Eclipse, delete the new .cpp and .h files in the new project folder and move all .cpp and .h files over from the old project. Nothing else.
Open up eclipse again and you should be able to open the old .cpp and.h files from your project. Of course, then you will need to re-import all libraries and re-set the project properties, e.g. What board you are using, the port it’s on etc.
Hope that helps. I think I’ll cast that into another little tutorial. I had to do that many times when helping Jantje to test new versions.
Thanks very much. I haven’t used the 1.x version of the plugin. I’m only just in the process of switching to Eclipse. I already had Indigo on an Ubuntu VM for my Beaglebone Black. Got that all working today including remote debugging:-) But back to Arduino…
I installed Juno on my host Mac, followed Jantje’s instructions and it all went fine. I haven’t had a chance to test it out yet. I want to use the 2.x version to build for my Teensy 3.0 and hopefully the Spark Core when that arrives. I’m just too used to a full featured IDE at work that I can’t be doing with the Arduino IDE beyond trivial sketches. Trouble is all my time gets sucked into setup and config tasks and not a lot of actually project work at the moment;-)
Again thanks for your comments. I may try Kepler on my VM for the Beaglebone at some point but not right now.
Steve
Aha. Then I misunderstood you post. No problem.
I can verify that this works with the Teensy3. Whether it works with the Sparkcore is another question. The Teensy3 uses an Arm Cortex M4 and the Sparkcore uses an M3. Also the Teensy3 has a special bootloader on the extra little chip on the board, which I believe the Sparkcore has not.
The halfkay yes.
I’m willing to give the Sparkcore a go. Not a lot of detail yet on the IDE but under it all will hopefully be something that we can work with. Learning a lot through others work so willing to have a crack at it.
Hi,
I am having some issue with regards the arduino plugin V2 1.0.4 which can be summarized as below:
2. When I am trying to use printf function it is only work in void loo (). When I am inserting it the Void setup is not showing in the serial monitor
#include “Due_Toochain.h”
#include
//The setup function is called once at startup of the sketch
void setup()
{
// Add your initialization code here
Serial.begin(115200);
Serial.print(“testing”);
printf(“Test”);
}
// The loop function is called in an endless loop
void loop()
{
//printf(“Test”);
}
1. I want to link the project with static library but in arduino toolchain I couldn’t find a way to do such link. The library I want to link is relic-toolkit in which I need to link against librelic.a file. Normally i used to do the linking using for example ARM Sourcery GCC linker but in this toolchain is nothing such this
I wish you can help me in the above issues as soon as possible since I am struggle in these problem for about one month and I could not processed in my project
From your description it is not clear to me this is an issue with the plugin. The code you posted also is missing The letter “L” in:
#include . It should be Toolchain.
Have you tried to compile this with the Regular Arduino 1.5.2 beta IDE And if so, was it successful ?
In the microcontroller world AFIK there is no dynamic linking. Micro-controllers commonly don’t have an operating system or the resources to support that. In the Arduino IDE, libraries usually are not pre-compiled but are supplied in the form off source code. Due the to large variety of micro controllers pre-compilation would make relatively little sense.
At compile time the Arduino IDE compiles and linked everytihing statically.
I can’t offer any help with the scanf() code example.
yes currently i am using arduino IDE 1.5.2
and the code i used as below
#include “Due_Toochain.h”
#include
//The setup function is called once at startup of the sketch
void setup()
{
// Add your initialization code here
Serial.begin(115200);
Serial.print(“testing”);
printf(“Test”);
}
// The loop function is called in an endless loop
void loop()
{
//printf(“Test”);
}
As I said I have two problems:
1. printf function is only working in the void loop not work at all in the void setup function
2. I can’t found in the eclipse tool setting ARM Sourcery Linux GCC C++ linker
These tools only the used by arduino toolchain
Arduino C++ Compiler
Arduino C Compiler
Arduino archiver
Arduino combiner
Arduino tool Create eeprom
Arduino tool Create hex
Arduino tool Print Size
Whereas I am looking for something similar to
ARM Sourcery Linux GCC Assembler
ARM Sourcery Linux GCC C Compiler
ARM Sourcery Linux GCC C++ Compiler
ARM Sourcery Linux GCC C Linker
ARM Sourcery Linux GCC C++ Linker
ARM Sourcery Linux GCC Archiver
ARM Sourcery Linux GNU Create Flash Image
ARM Sourcery Linux GNU Create Listing
ARM Sourcery Linux GNU Print Size
in which it can allow me to link the library to ARDUINO DUE
I cannot really comment on how to get this working on an Arduino Due as I don’t own one. From the documentation on the relic-toolkit web site mention an Eclipse plugin, however that would not be the plugin written by Jantje. I believe this would be the GNU ARM plugin
In the Arduino IDE 1.5.2 the ARM toolchain for the Due (I believe) is in:
/Contents/Java/tools/g++_arm_none_eabi/bin/ and
/Contents/Java/tools/g++_arm_none_eabi/arm-none-eabi/bin/
These directories should include what is needed to compile and link a program to run on your Due. I don’t know how to link this to an existing, pre-compiled library such as as the ones provided by the relic-toolkit.
The plug in link is broken.
Hi Robert,
You cannot access the update site directly by clicking on the link in the blog post., but only through the plugin installation through Eclipse. Ive done it many times and it still works.
Unfortunately the editing abilities of WordPress.com are absolutely dismal and whenever I put a url in the text it automatically makes a link out of it.
However, __http://www.baeyens.it/eclipse/V2__ still works
Nope – even through eclipse that link is broken now… 😦
That concerns me as I really don’t know how to help you guys In response to your post I’ve just installed Eclipse Kepler on my work computer that never had Eclipse or the plugin installed before and it went without a problem. It took less than 5 minutes, including downloading and installing Eclipse and installing the Arduino Eclipse plugin.
That’s odd – I tried the whole of Friday – I’ll give it a go now again. Maybe something was wrong with the servers then.
Uncheck “Group items by category” on the available software box !
Because there are no categories
hey,
Usign http://www.baeyens.it/eclipse/V2 as url, I cannot access the update site. I get “You don’t have permission to access /eclipse/V2/ on this server.”. How can I get access to the plugin?
regards,
steven
Steven,
You cannot obtain the plugin by clicking on the link here in this blog post. As described in the tutorial, you need to install Eclipse first and then go through “help” –> “Install new software…” and then “Add…” the URL in the dialog within Eclipse.
Make sure to un-check all the checked boxes so you can actually see the plugin for selection.
In other words, please follow the steps as outlined in the Tutorial 😉
hey,
I forgot to un-check all the boxes. Now, I can install the version 2 plugin.
Is it only working with arduino 1.5 or can I use 1.0.5 with version 2 of the plugin?
regards
You have to use 1.5 beta with Version 2 of the plugin. 1.0.5 will not work. The reasons for this is that 1.5 has mechanisms in place that allow the use of multiple platforms (cores) e.g. Atmel based Arduino Boards as well as Due and Teensy based boards that are based on Arm cortex processors.
Hi,
I am using Ubuntu 13.04 and I am stuck at step 5:
“Move the entire “teensy” folder into the “/hardware” folder of the Arduino 1.5.2 IDE. ”
I can’t find the folder /hardware. Maybe there is a different path on Ubuntu?
Thanks,
Romain
Hi Romain,
I work on a Mac and I am not sure exactly where “things” are installed in Linux. However, I do have a Ubuntu Version running in a virtual machine (VMware-Fusion) and will test out the instructions using an Ubuntu Distribution.
This will take a a few days however 😉
In the mean time, should you have been able to figure it out yourself I’d really appreciate it if you could post how you got it to work, so I can add it to the instructions.
Greets,
Peter
Hi Peter,
Yeah I will tell you if I manage to install it. I have searched a bit on google but nothing so far.
Cheers,
Romain
Romain,
I don’t know what process you went through to install the Arduino 1.5.4 IDE, however I just downloaded the .tar.gz from the Arduino web site and unpacked it to my Ubuntu 12.04 desktop. That left a folder with the name arduino-1.5.4 on the desktop. When opening the folder there is the “hardware” folder.
Thats where the “teensy” folder in step 5 goes.
I’ve come across a problem when creating the first project and have contacted Jantje but otherwise the Plugin installs just fine.
Hi,
So I installed it the easy way: “sudo apt-get install arduino”.
And I managed to find the /hardware/ folder. It’s in: /usr/share/arduino/hardware/. Then the Plugin install went fine.
But I have got problems compiling my first sketch:
/usr/share/arduino/hardware/tools/avr/bin/avr-g++: not found
Have you checked if that folder/file exists ?
It’s should there in any Arduino version as it is a standard Arduino file.
I have checked, the folder doesn’t exist BUT in the folder: /usr/share/arduino/hardware/tools/ There are two files: avrdude and avrdude.conf which are actually two links.
avrdude is a link to /usr/bin/
avrdude.conf is a link to /etc/avrdude.conf
In usr/bin there is the file avr-g++.
I tried to create the folder /usr/share/arduino/hardware/tools/avr/bin/ and put avr-g++ inside but I got other errors when I compile.
I also got a pop up saying: Problem running CDT Scanner Discovery provider it.bayens.arduino.languageSettingsProvider.
Maybe I should just install it your way, it will be easier.
I followed the instructions as I upgraded the Arduino IDE to 1.5.2 from 1.0.5, uninstalled the old plugin 1.1.7 and installed the new one 2.1.0.4.
But now when I go to properties it gives me an error as the field “Arduino IDE Version” = 1.0.5 So I cannot finish adding the path to the folders.
I uninstalled the plugin, removed all mentions to Arduino in Eclipse (used -clean -refresh) and re-installed the plugin, but the problem persists…”Arduino IDE Version” = 1.0.5
I am on a mac OS 10.8.5
I need to add the error “Arduino folder is not correct!”
but I am using the following paths:
/Applications/Arduino.app/Contents/Resources/Java
/Applications/Arduino.app/Contents/Resources/Java/libraries
thx
These paths you have specified are both incorrect.
A. In your case the folder that needs to point to the Arduino IDE needs to read “/Applications/Arduino.app” (without the quotation marks 😉
B. The libraries folder you need to point to is called “Private Library path” for a reason :-), It is NOT the path to the libraries that come with the Arduino IDE. This is where you host your own libraries that you may have downloaded and placed there manually. It is usually a subfolder in the folder where all your own Arduino sketches reside.
When upgrading form version 1.xxx, cleaning and refreshing is not doing what you think it does. Old projects created with pre 2.1.0.4 versions of the Arduino Eclipse Plugin are simply not compatible with the new version and have to be re-created. When you create a new sketch with the plugin it will create a folder with the project name in the usual Arduino Sketch folder with the name of that project. Within that project folder Eclipse creates other folders and files of which some are hidden.
To really clean your project of all references to the old Plugin, move all the code files you’ve written to a safe location and delete the entire Project directory.
Then, back in Eclipse you can create a new project with EXACTLY the same name as the old project. Eclipse will place a template .cpp and .h file in the project.
Close Eclipse and replace these files with your original code.
After starting Eclipse you should now see your old source code back in the project. Of course all libraries you previously imported have to be re-imported, but all that is done fairly quickly.
I’ll add a page for people that upgrade from the 1.xx version soon.
I found I had to use these paths because /Applications/Arduino.app didn’t work on OS X:
for the IDE:
/Applications/Arduino.app/Contents/Resources/Java
for libraries it was the default place,
/Users/andrew/Documents/Arduino/libraries
That worked! Thank you
Hey there, I’ve installed the plugin in eclipse but I didn’t get anything in the preferences dialog labeled ‘arduino’. If it helps, the tab labeled ‘C/C++’ that I see in your screenshots and I saw before I installed the plugin in gone from the preferences dialog after installing the plugin. Don’t know if that has anything to do with it though. Any advice here would be great! I’m running 32bit Juno on Windows 7 64bit
Hi Tim,
I must say that this has me stumped! I have a Windows 7 installation on Bootcamp and installed Eclipse Juno 32 bit and then I installed the Plugin. No problems!
I cannot reproduce what you are seeing. Just as in the screenshots in OSX in the preferences window I see “General” followed by “Arduino” and “C/C++”.
Did you use a fresh Eclipse installation or were you upgrading from the previous version of the Plugin ?
While you are running a Win7 64bit environment and I am on a 32bit version I cannot imagine that should be the problem.
Yeah, it’s strange for sure. I’ve tried v1 and v2 of the plugin and all on fresh installs of Juno. I’m just unzipping the Juno .zip download and running from the resulting directory, which I assume is how it works, that how I’ve always used eclipse before. I’ve tried both the 32 and 64bit versions of Juno with no difference. Just now I tried starting in XP compatibility mode with the same result.
Hi,
I am sorry that I cannot be of more help, but I really have not been able to reproduce the behavior you described. Should you be able to figure out what the problem is I hope you post it here.
Also, you can always post this in the Eclipse Plugin specific thread on the Arduino Forum. I know that Jantje, the author of the plugin often provides support in that thread.
Hey there,
I managed to install the plugin, but I fail to compile even a simple LED on/off example. I installed arduino 1.5.2 and the plugin 2.1.0.4, but when I try to compile, I get the following error:
make all
Building file: /opt/arduino-1.5.2/hardware/teensy/all/cores/teensy3/HardwareSerial1.cpp
Starting C++ compile
“/opt/arduino-1.5.2/hardware/teensy/tools/linux/arm-none-eabi/bin/arm-none-eabi-g++” -c -g -Os -w -ffunction-sections -fdata-sections -nostdlib -fno-rtti -fno-exceptions -mcpu=cortex-m4 -DF_CPU=48000000 -DUSB_SERIAL -DLAYOUT_US_ENGLISH -MMD -DARDUINO=152 -mthumb -D__MK20DX128__ -felide-constructors -std=gnu++0x -I”/opt/arduino-1.5.2/hardware/teensy/all/cores/teensy3″ -MMD -MP -MF”arduino/HardwareSerial1.cpp.d” -MT”arduino/HardwareSerial1.cpp.d” -x c++ “/opt/arduino-1.5.2/hardware/teensy/all/cores/teensy3/HardwareSerial1.cpp” -o “arduino/HardwareSerial1.cpp.o” -Wall
/opt/arduino-1.5.2/hardware/teensy/tools/linux/arm-none-eabi/bin/arm-none-eabi-g++: 3: /opt/arduino-1.5.2/hardware/teensy/tools/linux/arm-none-eabi/bin/arm-none-eabi-g++: Syntax error: “)” unexpected
make: *** [arduino/HardwareSerial1.cpp.o] Error 2
If I change the board to Teensy 2 it compiles allright. What am I missing?
Thanks in advance
Hi,
I am not the author of the plugin and do not work on Linux so I cannot offer much support. I believe your installation went correct and based on your console capture you may well have come across a bug in the current plugin.
I would strongly suggest posting this in the Eclipse Plugin Thread on the Arduino Forum.
I know that Jantje answers questions there frequently:
http://forum.arduino.cc/index.php?topic=79595.345
Hey there,
I managed to install the plugin in eclipse, but I fail to compile even a simple led on/off example. I am using arduino 1.5.2 and plugin 2.1.0.4, but when I try to compile for the Teensy 3 I get the following error:
make all
Building file: /opt/arduino-1.5.2/hardware/teensy/all/cores/teensy3/HardwareSerial1.cpp
Starting C++ compile
“/opt/arduino-1.5.2/hardware/teensy/tools/linux/arm-none-eabi/bin/arm-none-eabi-g++” -c -g -Os -w -ffunction-sections -fdata-sections -nostdlib -fno-rtti -fno-exceptions -mcpu=cortex-m4 -DF_CPU=48000000 -DUSB_SERIAL -DLAYOUT_US_ENGLISH -MMD -DARDUINO=152 -mthumb -D__MK20DX128__ -felide-constructors -std=gnu++0x -I”/opt/arduino-1.5.2/hardware/teensy/all/cores/teensy3″ -MMD -MP -MF”arduino/HardwareSerial1.cpp.d” -MT”arduino/HardwareSerial1.cpp.d” -x c++ “/opt/arduino-1.5.2/hardware/teensy/all/cores/teensy3/HardwareSerial1.cpp” -o “arduino/HardwareSerial1.cpp.o” -Wall
/opt/arduino-1.5.2/hardware/teensy/tools/linux/arm-none-eabi/bin/arm-none-eabi-g++: 3: /opt/arduino-1.5.2/hardware/teensy/tools/linux/arm-none-eabi/bin/arm-none-eabi-g++: Syntax error: “)” unexpected
make: *** [arduino/HardwareSerial1.cpp.o] Error 2
If I change to board to Teensy 2 it compiles allright. What am I missing?
Thanks in advance.
Instead of pushing finish I have to press next and then this comes up “Step 10”
Cannot complete the install because one or more required items could not be found.
Software being installed: Arduino eclipse extensions 2.1.0.4 (it.baeyens.arduino.feature.feature.group 2.1.0.4)
Missing requirement: Arduino eclipse extensions 2.1.0.4 (it.baeyens.arduino.feature.feature.group 2.1.0.4) requires ‘org.eclipse.cdt.core 5.3.0’ but it could not be found
Hi Nick,
You have not provided much info as to what hardware/ software environment you have attempted installation of the plugin.
It looks like the plugin is missing a component in Eclipse that is required for running plugins. Given the information you have provided I would suggest that should start with a fresh installation of Eclipse Juno for C/C++ developers. Don’t use the newer Kepler version or a non C/C++ version of these tools.
Had same problem. I have not installed the c++ plugin for eclipse. To solve this issue please hit:
sudo apt-get install eclipse-cdt g++
This should do the magic 🙂
The “Teensy Extension File” download link is broken. Is it obsolete? I have everything set up in Eclipse but I have no “teensy” hardware option when I create a new project.
Hi Scott,
Yes that link is obsolete and the page is there only for historical reasons. You should really use the newest version of the Arduino Eclipse Plugin or even better the Arduino Eclipse IDE as that bundles a compatible version of Eclipse and the Plugin.
If you look through the Arduino etc. menu on my blog you’ll find a description of how to make that “extension file” yourself either on OS X on Windows 7.
It may actually be possible that since Teensyduino 1.21 supports Arduino 1.6.1 these instructions all are obsolete but I’ve not had the time to test this out.
Hi,
I tried to install Eclipse and the Arduino plugin under Win7 32bit, if I enter the Arduino IDE path I always get the error “Arduino folder is not correct!”. I thought the path is where the Arduino.exe is located, I am rigth or did I understand this in a wrong way.
Hi, for these sort of errors I’d advise you to post it on the Arduino forum in the thread for the plugin. I have a link posted in the ” other resources” section.
Hey there trippylighting 🙂
I’m trying to install processing now to use it in Eclipse with the Arduino Plugin but I don’t know how to start as all the instructions on Websites I found are written for the Arduino IDE only. So what shall I do here? I need processing.
Thanks alot!
Cheerio
Marco
Sorry. I cannot help you with that. If I understand it correctly Processing code is based on Java, where a Arduino Sketches are C/C++.
The Arduino Eclipse plugin is unlikely of any help to you. The latest version V3 does not even require an Arduino IDE.